Abstract Factory Pattern says that just define an interface or abstract class for creating families of related (or dependent) objects but without specifying their concrete sub-classes.
Abstract Factory lets a class returns a factory of classes. So, this is the reason that Abstract Factory Pattern is one level higher than the Factory Pattern.
An Abstract Factory Pattern is also known as Kit.
Advantage of Abstract Factory Pattern
Abstract Factory Pattern isolates the client code from concrete (implementation) classes.
It eases the exchanging of object families.
It promotes consistency among objects.
Usage of Abstract Factory Pattern
When the system needs to be independent of how its object are created, composed, and represented.
When the family of related objects has to be used together, then this constraint needs to be enforced.
When you want to provide a library of objects that does not show implementations and only reveals interfaces.
When the system needs to be configured with one of a multiple family of objects.
Abstract Factory patterns work around a super-factory which creates other factories. This factory is also called as factory of factories. This type of design pattern comes under creational pattern as this pattern provides one of the best ways to create an object.
In Abstract Factory pattern an interface is responsible for creating a factory of related objects without explicitly specifying their classes. Each generated factory can give the objects as per the Factory pattern
Design Pattern
Design Pattern Introduction
A design pattern is a general reusable solution to a commonly occurring problem within a given context in software design. A design pattern is not a finished design that can be transformed directly into source or machine code. It is a description or template for how to solve a problem that can be used in many different situations. Patterns are formalized best practices that the programmer must implement in the application. Object-oriented design patterns typically show relationships and interactions between classes or objects, without specifying the final application classes or objects that are involved. Patterns that imply object-orientation or more generally mutable state, are not as applicable in functional programming languages.
The types of design patterns are Creational, Structural, and Behavioral design patterns.
Creational Design Pattern
Creational design patterns are design patterns that deal with object creation mechanisms, trying to create objects in a manner suitable to the situation. The basic form of object creation could result in design problems or added complexity to the design. Creational design patterns solve this problem by somehow controlling this object creation. Types of creational design patterns are:
Structural design patterns are concerned with how classes and objects can be composed, to form larger structures.
The structural design patterns simplifies the structure by identifying the relationships.
These patterns focus on, how the classes inherit from each other and how they are composed from other classes.
Behavioral Design Pattern
Behavioral design patterns are design patterns that identify common communication patterns between objects and realize these patterns. By doing so, these patterns increase flexibility in carrying out this communication.
Template Method Pattern
Mediator Pattern
Chain of Responsibility Pattern
Observer Pattern
Strategy Pattern
Command Pattern
State Pattern
Visitor Pattern
Iterator Pattern
Memento Pattern
Java Singleton Design Pattern Best Practices with Examples
Singleton is one of the Gangs of Four Design patterns and comes in the Creational Design Pattern category. From the definition, it seems to be a very simple design pattern but when it comes to implementation, it comes with a lot of implementation concerns. The implementation of Singleton pattern has always been a controversial topic among developers. Here we will learn about Singleton design pattern principles, different ways to implement Singleton and some of the best practices for it’s usage.
Singleton Pattern
Singleton pattern restricts the instantiation of a class and ensures that only one instance of the class exists in the java virtual machine. The singleton class must provide a global access point to get the instance of the class. Singleton pattern is used for logging, drivers objects, caching and thread pool.
Singleton design pattern is also used in other design patterns like Abstract Factory, Builder, Prototype, Facade etc. Singleton design pattern is used in core java classes also, for example java.lang.Runtime, java.awt.Desktop.
Java Singleton Pattern
To implement Singleton pattern, we have different approaches but all of them have following common concepts.
Private constructor to restrict instantiation of the class from other classes.
Private static variable of the same class that is the only instance of the class.
Public static method that returns the instance of the class, this is the global access point for outer world to get the instance of the singleton class.
In further sections, we will learn different approaches of Singleton pattern implementation and design concerns with the implementation.
In eager initialization, the instance of Singleton Class is created at the time of class loading, this is the easiest method to create a singleton class but it has a drawback that instance is created even though client application might not be using it.
Here is the implementation of static initialization singleton class.
EagerInitializedSingleton.java
1
2
3
4
5
6
7
8
9
10
11
12
13
package com.journaldev.singleton;
public class EagerInitializedSingleton {
private static final EagerInitializedSingleton instance = new EagerInitializedSingleton();
//private constructor to avoid client applications to use constructor
private EagerInitializedSingleton(){}
public static EagerInitializedSingleton getInstance(){
return instance;
}
}
If your singleton class is not using a lot of resources, this is the approach to use. But in most of the scenarios, Singleton classes are created for resources such as File System, Database connections etc and we should avoid the instantiation until unless client calls the getInstance method. Also this method doesn’t provide any options for exception handling.
Static block initialization
Static block initialization implementation is similar to eager initialization, except that instance of class is created in the static block that provides option for exception handling.
StaticBlockSingleton.java
1
package com.journaldev.singleton;
public class StaticBlockSingleton {
private static StaticBlockSingleton instance;
private StaticBlockSingleton(){}
//static block initialization for exception handling
static{
try{
instance = new StaticBlockSingleton();
}catch(Exception e){
throw new RuntimeException("Exception occured in creating singleton instance");
}
}
public static StaticBlockSingleton getInstance(){
return instance;
}
}
Both eager initialization and static block initialization creates the instance even before it’s being used and that is not the best practice to use. So in further sections, we will learn how to create Singleton class that supports lazy initialization.
Lazy initialization method to implement Singleton pattern creates the instance in the global access method. Here is the sample code for creating Singleton class with this approach.
LazyInitializedSingleton.java
1
2
3
4
5
6
7
8
9
10
11
12
13
14
15
package com.journaldev.singleton;
public class LazyInitializedSingleton {
private static LazyInitializedSingleton instance;
private LazyInitializedSingleton(){}
public static LazyInitializedSingleton getInstance(){
if(instance == null){
instance = new LazyInitializedSingleton();
}
return instance;
}
}
The above implementation works fine incase of single threaded environment but when it comes to multithreaded systems, it can cause issues if multiple threads are inside the if loop at the same time. It will destroy the singleton pattern and both threads will get the different instances of singleton class. In next section, we will see different ways to create a thread-safe singleton class.
Thread Safe Singleton
The easier way to create a thread-safe singleton class is to make the global access method synchronized, so that only one thread can execute this method at a time. General implementation of this approach is like the below class.
ThreadSafeSingleton.java
1
2
3
4
5
6
7
8
9
10
11
12
13
14
15
16
package com.journaldev.singleton;
public class ThreadSafeSingleton {
private static ThreadSafeSingleton instance;
private ThreadSafeSingleton(){}
public static synchronized ThreadSafeSingleton getInstance(){
if(instance == null){
instance = new ThreadSafeSingleton();
}
return instance;
}
}
Above implementation works fine and provides thread-safety but it reduces the performance because of cost associated with the synchronized method, although we need it only for the first few threads who might create the separate instances (Read: Java Synchronization). To avoid this extra overhead every time, double checked locking principle is used. In this approach, the synchronized block is used inside the if condition with an additional check to ensure that only one instance of singleton class is created.
Below code snippet provides the double checked locking implementation.
1
2
3
4
5
6
7
8
9
10
public static ThreadSafeSingletongetInstanceUsingDoubleLocking(){
Prior to Java 5, java memory model had a lot of issues and above approaches used to fail in certain scenarios where too many threads try to get the instance of the Singleton class simultaneously. So Bill Pugh came up with a different approach to create the Singleton class using ainner static helper class. The Bill Pugh Singleton implementation goes like this;
BillPughSingleton.java
1
2
3
4
5
6
7
8
9
10
11
12
13
14
package com.journaldev.singleton;
public class BillPughSingleton {
private BillPughSingleton(){}
private static class SingletonHelper{
private static final BillPughSingleton INSTANCE = new BillPughSingleton();
}
public static BillPughSingletongetInstance(){
return SingletonHelper.INSTANCE;
}
}
Notice the private inner static class that contains the instance of the singleton class. When the singleton class is loaded, SingletonHelper class is not loaded into memory and only when someone calls the getInstance method, this class gets loaded and creates the Singleton class instance.
This is the most widely used approach for Singleton class as it doesn’t require synchronization. I am using this approach in many of my projects and it’s easy to understand and implement also.
When you run the above test class, you will notice that hashCode of both the instances are not same that destroys the singleton pattern. Reflection is very powerful and used in a lot of frameworks like Spring and Hibernate, do check out Java Reflection Tutorial.
Enum Singleton
To overcome this situation with Reflection, Joshua Bloch suggests the use of Enum to implement Singleton design pattern as Java ensures that any enum value is instantiated only once in a Java program. Since Java Enum values are globally accessible, so is the singleton. The drawback is that the enum type is somewhat inflexible; for example, it does not allow lazy initialization.
Sometimes in distributed systems, we need to implement Serializable interface in Singleton class so that we can store it’s state in file system and retrieve it at later point of time. Here is a small singleton class that implements Serializable interface also.
SerializedSingleton.java
1
2
3
4
5
6
7
8
9
10
11
12
13
14
15
16
17
18
19
package com.journaldev.singleton;
import java.io.Serializable;
public class SerializedSingleton implements Serializable{
private static final long serialVersionUID = -7604766932017737115L;
private SerializedSingleton(){}
private static class SingletonHelper{
private static final SerializedSingleton instance = new SerializedSingleton();
}
public static SerializedSingletongetInstance(){
return SingletonHelper.instance;
}
}
The problem with above serialized singleton class is that whenever we deserialize it, it will create a new instance of the class. Let’s see it with a simple program.
SingletonSerializedTest.java
1
2
3
4
5
6
7
8
9
10
11
12
13
14
15
16
17
18
19
20
21
22
23
24
25
26
27
28
29
30
31
32
package com.journaldev.singleton;
import java.io.FileInputStream;
import java.io.FileNotFoundException;
import java.io.FileOutputStream;
import java.io.IOException;
import java.io.ObjectInput;
import java.io.ObjectInputStream;
import java.io.ObjectOutput;
import java.io.ObjectOutputStream;
public class SingletonSerializedTest {
public static void main(String[] args) throws FileNotFoundException, IOException, ClassNotFoundException {
Factory pattern is one of the most used design patterns in Java. This type of design pattern comes under creational pattern as this pattern provides one of the best ways to create an object.
In Factory pattern, we create object without exposing the creation logic to the client and refer to newly created object using a common interface.
Implementation
We're going to create aShapeinterface and concrete classes implementing theShapeinterface. A factory classShapeFactoryis defined as a next step.
FactoryPatternDemo, our demo class will useShapeFactoryto get aShapeobject. It will pass information (CIRCLE / RECTANGLE / SQUARE) toShapeFactoryto get the type of object it needs.
Step 1
Create an interface.
Shape.java
publicinterfaceShape{
void draw();
}
Step 2
Create concrete classes implementing the same interface.
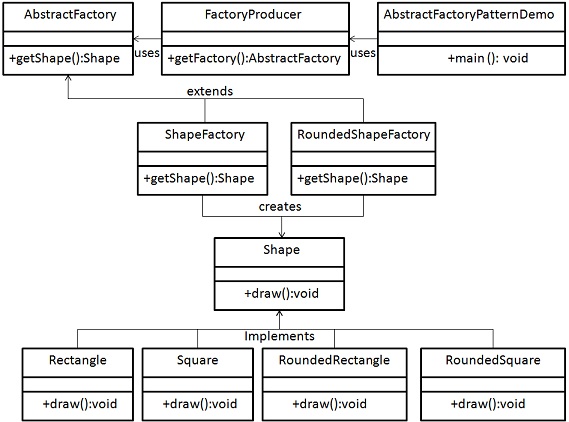
Abstract Factory patterns work around a super-factory which creates other factories. This factory is also called as factory of factories. This type of design pattern comes under creational pattern as this pattern provides one of the best ways to create an object.
In Abstract Factory pattern an interface is responsible for creating a factory of related objects without explicitly specifying their classes. Each generated factory can give the objects as per the Factory pattern.
Implementation
We are going to create a Shape interface and a concrete class implementing it. We create an abstract factory class AbstractFactory as next step. Factory class ShapeFactory is defined, which extends AbstractFactory. A factory creator/generator class FactoryProducer is created.
AbstractFactoryPatternDemo, our demo class uses FactoryProducer to get a AbstractFactory object. It will pass information (CIRCLE / RECTANGLE / SQUARE for Shape) to AbstractFactory to get the type of object it needs.
No comments:
Post a Comment